How to build a Web Components app with Redux!
The flux pattern has proved useful for more complex applications. The Redux npm package has been used extensively in React applications for years but can also be used in similar ways with LitElement style web components.
In this tutorial we will re-create the Redux/React Todos example, but this time with pure LitElement style web components. The tutorial is a bit longer, but it will give you a good understanding of how both LitElement and Redux works.
With Web Components, we do not need the Virtual DOM layer as several other frameworks do, and we can therefore render apps with higher performance, and we also get the possibility to reuse our components in various front end environments, with frameworks or framework-less, rather than being locked into a React or Vue only environment.
This tutorial requires you to know the basics about modern JavaScript, HTML, and CSS, but no other specific framework. To create the Web Components we will use a helper package called LitElement maintained by Google and the Polymer team, but we will go through how to use that library as we go.
Let's get started!
Install Node.js and npm
If you do not have a Node.js/npm installed on your system, start by installing them from https://nodejs.org/en/ , if you have it installed already make sure that you are at least at version 14.15.5 for Node.js to ensure that this tutorial works as intended.
Creating the project with Open Web Components toolkit
Using the guided generator npm init @open-wc (from https://open-wc.org/) with selected values below we get a base project to work with.
$ npm init @open-wc
npx: installed 42 in 1.933s

        _.,,,,,,,,,._
     .d''           ``b.       Open Web Components Recommendations
   .p'      Open       `q.
 .d'    Web Components  `b.    Start or upgrade your web component project with
 .d'                     `b.   ease. All our recommendations at your fingertips.
 ::   .................   ::
 `p.                     .q'   See more details at https://open-wc.org/init/
  `p.    open-wc.org    .q'
   `b.     @openWc     .d'
     `q..            ..,'      Note: you can exit any time with Ctrl+C or Esc
        '',,,,,,,,,,''


✔ What would you like to do today? › Scaffold a new project
✔ What would you like to scaffold? › Application
✔ What would you like to add? › Building (rollup)
✔ Would you like to use typescript? › No
✔ Would you like to scaffold examples files for? › Building (rollup)
✔ What is the tag name of your application/web component? … wj-todos

./
├── wj-todos/
│   ├── src/
│   │   ├── open-wc-logo.js
│   │   ├── wj-todos.js
│   │   └── WjTodos.js
│   ├── .editorconfig
│   ├── .gitignore
│   ├── custom-elements.json
│   ├── index.html
│   ├── LICENSE
│   ├── package.json
│   ├── README.md
│   ├── rollup.config.js
│   └── web-dev-server.config.mjs

✔ Do you want to write this file structure to disk? › Yes
Writing..... done
✔ Do you want to install dependencies? › Yes, with npm

Installing dependencies...
...

If you want to rerun this exact same generator you can do so by executing:
npm init @open-wc --type scaffold --scaffoldType app --features building --typescript false --scaffoldFilesFor building --tagName wj-todos --writeToDisk true --installDependencies npm

You are all set up now!

All you need to do is run:
  cd wj-todos
  npm run start
To get the exact setup as stated above you can use the generator command directly:
$ npm init @open-wc --type scaffold --scaffoldType app --features building --typescript false --scaffoldFilesFor building --tagName wj-todos --writeToDisk true --installDependencies npm
Start the generated app with $ npm start from inside the new wj-todos directory.
A browser window should popup with the default sample app running, and in the terminal you will see something like the following:
Web Dev Server started...

  Root dir: /home/user/repos/wj-todos
  Local:    http://localhost:8000/
  Network:  http://192.168.1.5:8000/
Now open the wj-todos directory with your favorite editor and let's start coding!
Cleaning up the generated code a bit
The entry file is the index.html file in the root directory, we'll keep this file as is, but to
get a good starting point, we'll remove the other files in the src/ directory.
Create the component
Create and open a new file called src/wj-todos.js.
import {LitElement, html} from 'lit-element';

class WJTodos extends LitElement {
  render() {
    return html`
      <wj-add-todo></wj-add-todo>
      <wj-todo-list></wj-todo-list>
      <wj-footer></wj-footer>
    `;
  }
}

customElements.define('wj-todos', WJTodos);
We first import LitElement to help us define the <wj-todos> component and then html that lets us create a tagged template literal that allows us to render HTML with data bindings (as we will see later in this tutorial) in a secure way in the render function of the component.
As none of the elements (<wj-add-todo>, <wj-todo-list>, <wj-footer>) rendered in the render function exists yet they will just render as plain empty elements until we have declared them as separate Web Components like we just did for <wj-todos>.
The last line registers our app component as a custom element that can then be used on any page where this JavaScript declaration is imported (as we do in index.html).
Save your file and let's check the result in the browser!
The page should now refresh if it was already open (else open the link from the dev server terminal window).
The page will render empty for now as the app has no content yet, but as the <wj-todos> tag is already imported and created in index.html, you should now see be able to inspect our newly created component in the DOM inspector (press F12 or right-click on the empty page and choose "Inspect Element"/"Inspect").
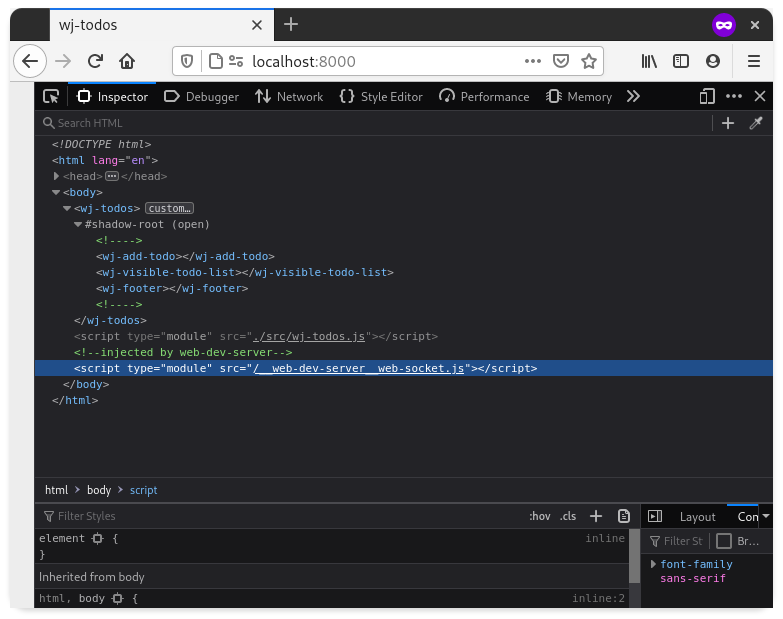
Notice that the child elements are rendered within a #shadow-root, all the details for that is for a future article, but a short and simplified version is that the ShadowRoot lets us encapsulate the CSS and HTML for this app so that it can be embedded in other HTML pages without any CSS rules leaking into this app.
Create the component
Create and open a new file called src/wj-add-todo.js.
import {LitElement, html} from 'lit-element';

class WJAddTodo extends LitElement {
  _addTodo(event) {
    event.preventDefault();

    const input = this.shadowRoot.querySelector('input');

    const value = input.value.trim() || undefined;
    if (value) {
      console.log('Add todo', value); // TODO: dispatch to the Redux store
      input.value = '';
    }
  }

  render() {
    return html`
      <form @submit="${this._addTodo}">
        <input type="text">
        <button type="submit">Add todo</button>
      </form>
    `;
  }
}

customElements.define('wj-add-todo', WJAddTodo);
This component has a _addTodo method that we will soon hook up to a Redux store so that we can dispatch the new todo item when the user clicks the submit button.
To bind to events inside the template literal strings we simply use @ symbol and then we put a reference to the component method that should handle the event @submit="${this._addTodo}".
Inside the _addTodo method we prevent the default behavior of the event so that the page will not refresh, then we select the input element to read its value and if the field has a value we will soon dispatch the new value to the Redux store, and finally reset the input fields value.
Notice that we need to use this.shadowRoot.querySelector('input') to select the input element as it is rendered within the components #shadow-root as seen in the image below.

Setup Redux
Redux is a tool that helps you keep track of your apps state in a central store. You can then dispatch actions or "events" to that store. The actions will then be interpreted by reducer functions that update the central state.
We will now create our first action, ADD_TODO to be used in the <wj-add-todo> component, then create a reducer that listens for this action, and finally the store that will keep track of the state.
Creating the add todo action
Let's now create an ADD_TODO action that can be dispatched to the store, create and open a new file called src/redux/actions.js.
let nextTodoId = 0;

export function addTodo(text) {
  return {
    type: 'ADD_TODO',
    id: nextTodoId++,
    text
  };
}
We add an incremental id to keep track of each todo item, then a function that returns an ADD_TODO action.
Creating the add todo reducer
Let's now create a reducer for the ADD_TODO action, create and open a new file called src/redux/reducer.js.
export function reducer(state = {todos: []}, action) {
  switch (action.type) {

    case 'ADD_TODO':
      return {
        ...state,
        todos: [
          ...state.todos,
          {
            id: action.id,
            text: action.text,
            completed: false
          }
        ]
      };

    default:
      return state

  }
}
The first argument state = {todos: []} has an object with an empty array fallback for the first run of the reducer. The second action argument is the action that is created by the previous addTodo function. Inside the switch statement, we update the state by creating a new array with the old todos as well as this new one. In Redux the state is immutable so we cannot use .push().
Setup Redux
Install redux dependency with:
$ npm install --save redux
Now, let's create and open a new file called src/redux/store.js.
import {createStore, combineReducers} from 'redux/es/redux.mjs';

import {reducer} from './reducer.js';

export const store = createStore(
  combineReducers({reducer}),
  window.__REDUX_DEVTOOLS_EXTENSION__?.()
);
One thing to note here is that you need to import Redux from redux/es/redux.mjs when running in the browser as it will otherwise look for Node.js specific APIs that make it crash on page load.
We import the reducer and create a new store, as we will later add more reducers we use combineReducers.
The window.__REDUX_DEVTOOLS_EXTENSION__?.() will allow you to use Redux DevTools (Firefox, Chrome) to debug your store.
Add todos to the store
We now need to put the todos created in the <wj-add-todo> form to the store.
Open and edit src/wj-add-todo.js:
import {LitElement, html} from 'lit-element';

import {store} from './redux/store.js';
import {addTodo} from './redux/actions.js';

class WJAddTodo extends LitElement {
  _addTodo(event) {
    event.preventDefault();

    const input = this.shadowRoot.querySelector('input');

    const value = input.value.trim() || undefined;
    if (value) {
      store.dispatch(addTodo(value));
      input.value = '';
    }
  }

  render() {
    return html`
      <form @submit="${this._addTodo}">
        <input type="text">
        <button type="submit">Add todo</button>
      </form>
    `;
  }
}
window.store = store

customElements.define('wj-add-todo', WJAddTodo);
We need to import the store and the addTodo action in the top, then in _addTodo we replace the temporary console.log call with store.dispatch(addTodo(value)); to send the new todo to the store.
List all the todos in the store with
To help us with hooking up LitElement components with the Redux store the pwa-helpers package provides a small mixin that we can use.
Install the package with:
$ npm install --save pwa-helpers
Create and open a new file called src/wj-todo-list.js.
import {LitElement, html} from 'lit-element';
import {connect} from 'pwa-helpers';
import {store} from './redux/store.js';
class WJTodoList extends connect(store)(LitElement) {
static get properties() {
return {
todos: {type: Array}
}
}
constructor() {
super();
this.todos = [];
}
stateChanged(state) {
this.todos = state.reducer.todos;
}
render() {
return html`
<h1>Todo</h1>
${this.todos.length > 0 ? (this.todos).map((todo) => html`
<div>
<input
.checked="${todo.completed}"
type="checkbox"
id="todo-${todo.id}"
value="${todo.id}"
>
<label for="todo-${todo.id}">${todo.text}</label>
</div>
`) : html`
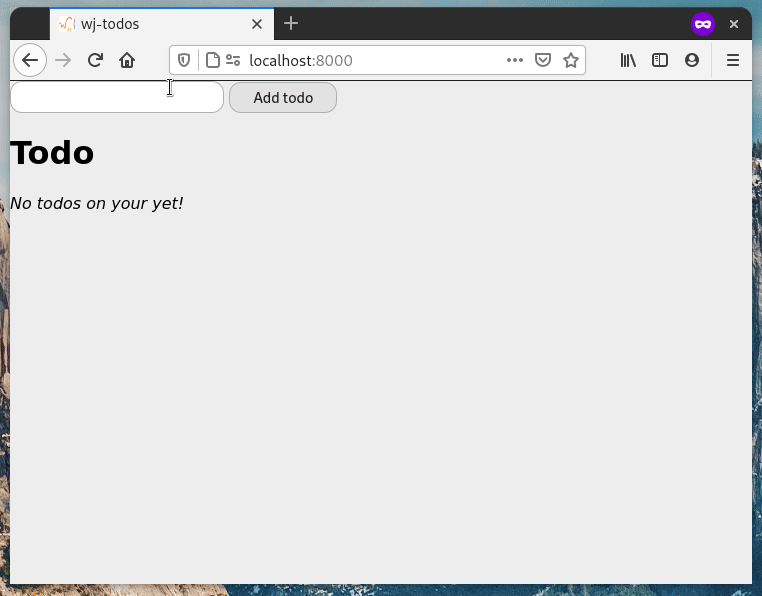
<p><em>Nothing to show here!</em></p>
`}
`;
}
}
customElements.define('wj-todo-list', WJTodoList);
Let's break down the code for the component a bit.
At the top, we import the new connect mixin as well as the store that we defined previously. We then use the mixin with class WJTodoList extends connect(store)(LitElement) to connect the component with the store.
Now the class method stateChanged will be called each time the state of the store changes, neat!
The component will need an Array property called todos to keep track of the current todo items that were last received from the store, also we need to ensure that the property starts as an empty array, we set that in the constructor:
  static get properties() {
    return {
      todos: {type: Array}
    }
  }

  constructor() {
    super();
    this.todos = [];
  }
In stateChanged we can now update the todos property from the stores state each time it changes:
  stateChanged(state) {
    this.todos = state.reducer.todos;
  }
As the reducer is registered with the name reducer in src/redux/store.js (line 6) we need to use that same property name on the state object.
Lastly we render the HTML for the list with an alternate text when there are no todos in the list:
  render() {
    return html`
      <h1>Todo</h1>
      ${this.todos.length > 0 ? (this.todos).map((todo) => html`
        <div>
          <input
            .checked="${todo.completed}"
            type="checkbox"
            id="todo-${todo.id}"
            value="${todo.id}"
          >
          <label for="todo-${todo.id}">${todo.text}</label>
        </div>
      `) : html`
        <p><em>Nothing to show here!</em></p>
      `}
    `;
  }
Each todo object will have the three properties id, text, and completed as we defined in src/redux/actions.js earlier.
Now we are ready to import the new components and try the app out!
Import and components and test run
Open and add the imports for the two new components at the top of src/wj-todos.js:
import {LitElement, html} from 'lit-element';

import './wj-add-todo.js';
import './wj-todo-list.js';

class WJTodos extends LitElement {
  render() {
    return html`
      <wj-add-todo></wj-add-todo>
      <wj-todo-list></wj-todo-list>
      <wj-footer></wj-footer>
    `;
  }
}

customElements.define('wj-todos', WJTodos);
Your page should refresh when you save the file and you should now be able to add todo items to the list with the form we created earlier, yay!
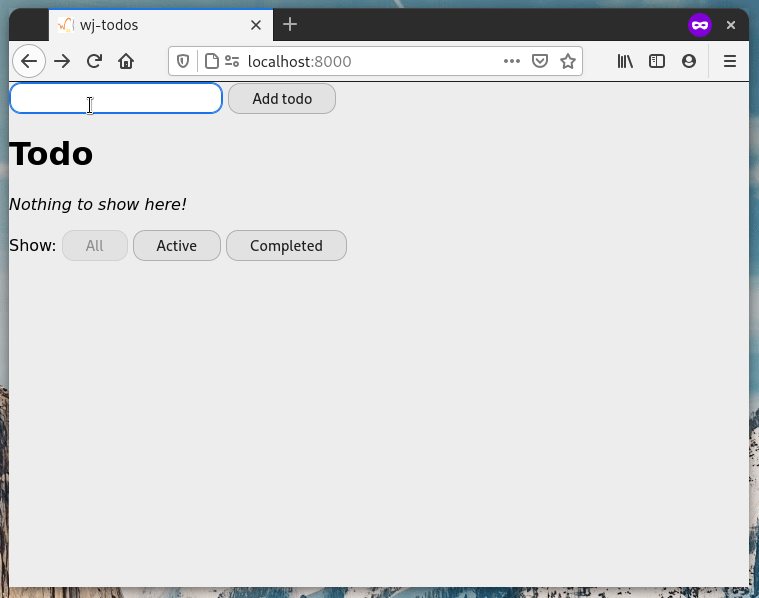
Add filtering for the completed items
To make the app a bit more complete we'll add one last feature. The ability to filter out the completed items from the list.
For this, we will need two new actions and some new reducer functionality, as well as some filter buttons in a new <wj-footer> component.
First lets create the toggleTodo and setVisibilityFilter actions in src/redux/actions.js:
let nextTodoId = 0;

export function addTodo(text) {
  return {
    type: 'ADD_TODO',
    id: nextTodoId++,
    text
  };
}

export function toggleTodo(id) {
  return {
    type: 'TOGGLE_TODO',
    id
  };
}

export function setVisibilityFilter(filter) {
  return {
    type: 'SET_VISIBILITY_FILTER',
    filter
  };
}

export const VisibilityFilters = {
  SHOW_ALL: 'SHOW_ALL',
  SHOW_COMPLETED: 'SHOW_COMPLETED',
  SHOW_ACTIVE: 'SHOW_ACTIVE'
};
Then we update our reducer with the TOGGLE_TODO and SET_VISIBILITY_FILTER actions in src/redux/reducer.js:
import {VisibilityFilters} from './actions.js';

const startState = {
  todos: [],
  filter: VisibilityFilters.SHOW_ALL
};

export function reducer(state = startState, action) {
  switch (action.type) {

    case 'ADD_TODO':
      return {
        ...state,
        todos: [
          ...state.todos,
          {
            id: action.id,
            text: action.text,
            completed: false
          }
        ]
      };

    case 'TOGGLE_TODO':
      // Loop the the todos and invert the completed property for each todo
      const todos = state.todos.map((todo) => (todo.id === action.id) ?
        {...todo, completed: !todo.completed} : todo);

      return {...state, todos};

    case 'SET_VISIBILITY_FILTER': // <-- add handler for SET_VISIBILITY_FILTER
      return {...state, filter: action.filter};

    default:
      return state

  }
}
Then we hookup each checkbox to the new action in src/wj-todo-list.js by simply importing the action and adding @input="${() => store.dispatch(toggleTodo(todo.id))}".
import {LitElement, html} from 'lit-element';
import {connect} from 'pwa-helpers';

import {store} from './redux/store.js';
import {toggleTodo} from './redux/actions.js'; // <-- Import the toggleTodo action

class WJTodoList extends connect(store)(LitElement) {
  static get properties() {
    return {
      todos: {type: Array}
    }
  }

  constructor() {
    super();
    this.todos = [];
  }

  stateChanged(state) {
    this.todos = state.reducer;
  }

  render() {
    return html`
      <h1>Todo</h1>
      ${this.todos.length > 0 ? (this.todos).map((todo) => html`
        <div>
          <input
            .checked="${todo.completed}"
            type="checkbox"
            id="todo-${todo.id}"
            value="${todo.id}"
            @input="${() => store.dispatch(toggleTodo(todo.id))}"${/* <-- Dispatch the toggleTodo action on input */}
          >
          <label for="todo-${todo.id}">${todo.text}</label>
        </div>
      `) : html`
        <p><em>Nothing to show here!</em></p>
      `}
    `;
  }
}

customElements.define('wj-todo-list', WJTodoList);
Now we create the <wj-footer> component in the new file src/wj-footer.js:
import {LitElement, html, css} from 'lit-element';
import {connect} from 'pwa-helpers';

import {store} from './redux/store.js';
import {setVisibilityFilter, VisibilityFilters} from './redux/actions.js';

class WJFooter extends connect(store)(LitElement) {
  static get styles() {
    return css`
      :host {
        display: block;
        margin-top: 1em;
      }
    `;
  }

  static get properties() {
    return {
      filter: {type: String}
    };
  }

  stateChanged(state) {
    this.filter = state.reducer.filter;
  }

  render() {
    return html`
      <span>Show:</span>
      <button
        ?disabled="${this.filter === VisibilityFilters.SHOW_ALL}"
        @click="${() => store.dispatch(setVisibilityFilter(VisibilityFilters.SHOW_ALL))}"
      >All</button>
      <button
        ?disabled="${this.filter === VisibilityFilters.SHOW_ACTIVE}"
        @click="${() => store.dispatch(setVisibilityFilter(VisibilityFilters.SHOW_ACTIVE))}"
      >Active</button>
      <button
        ?disabled="${this.filter === VisibilityFilters.SHOW_COMPLETED}"
        @click="${() => store.dispatch(setVisibilityFilter(VisibilityFilters.SHOW_COMPLETED))}"
      >Completed</button>
    `;
  }
}

customElements.define('wj-footer', WJFooter);
Then we add the filtering to the <wj-todo-list> component, open src/wj-todo-list.js:
import {LitElement, html} from 'lit-element';
import {connect} from 'pwa-helpers';

import {store} from './redux/store.js';
import {toggleTodo, VisibilityFilters} from './redux/actions.js';

class WJTodoList extends connect(store)(LitElement) {
  static get properties() {
    return {
      todos: {type: Array}
    };
  }

  constructor() {
    super();
    this.todos = [];
  }

  stateChanged(state) {
    this.todos = state.reducer.todos.filter((todo) => {
      switch (state.reducer.filter) {
        case VisibilityFilters.SHOW_ALL:
          return true;
        case VisibilityFilters.SHOW_COMPLETED:
          return todo.completed;
        case VisibilityFilters.SHOW_ACTIVE:
          return !todo.completed;
        default:
          throw new Error('Unknown filter: ' + state.reducer.filter);
      }
    });
  }

  render() {
    return html`
      <h1>Todo</h1>
      ${this.todos.length > 0 ? (this.todos).map((todo) => html`
        <div>
          <input
            .checked="${todo.completed}"
            type="checkbox"
            id="todo-${todo.id}"
            value="${todo.id}"
            @input="${() => store.dispatch(toggleTodo(todo.id))}"
          >
          <label for="todo-${todo.id}">${todo.text}</label>
        </div>
      `) : html`
        <p><em>Nothing to show here!</em></p>
      `}
    `;
  }
}

customElements.define('wj-todo-list', WJTodoList);
Finally import the <wj-footer> in src/wj-todos.js:
import {LitElement, html} from 'lit-element';

import './wj-add-todo.js';
import './wj-todo-list.js';
import './wj-footer.js';

class WJTodos extends LitElement {
  render() {
    return html`
      <wj-add-todo></wj-add-todo>
      <wj-todo-list></wj-todo-list>
      <wj-footer></wj-footer>
    `;
  }
}

customElements.define('wj-todos', WJTodos);
All done!
The full code for this example can be found at our GitHub page.